
I’ll never forget the sinking feeling in my stomach when I walked into my basement after a massive summer storm and heard the sound of sloshing water. A pipe connected to our main water line had burst, and about three inches of murky, ruinous water was slowly soaking into the drywall, the baseboards, and a stack of storage boxes.
My very first instinct was to panic, grab a mop, and start throwing things into trash bags. Luckily, a friend of mine who works in public adjusting stopped me over a frantic phone call.
“Stop touching things,” he said. “If you start cleaning up and throwing away evidence before you document it properly, your insurance company is going to hand you a massive bill for the difference.”
That single piece of advice saved my sanity—and my savings account. Dealing with property damage is incredibly stressful, but navigating the insurance claims machine doesn’t have to be a nightmare. Over the last couple of years, insurance companies have shifted aggressively toward digital, app-based claims, but the foundational rules of protecting your wallet remain exactly the same.
If your home has suffered a sudden loss from a burst pipe, a fallen tree, or a localized storm, here is the field-tested, step-by-step blueprint to file a home insurance claim and ensure you actually get paid what you are owed.
The Master Matrix: The Three Check Pool
When you file a major claim involving both structural damage and personal property, you need to understand that a single lump-sum check isn’t going to drop into your mailbox overnight. The settlement process splits your reimbursement into three distinct financial pipelines:
| Coverage Pipeline | What It Pays For | Important Nuance |
| Dwelling Coverage | Fixing the actual structure (walls, roof, floors, plumbing) | If you have a mortgage, this check will be made out to both you and your lender. |
| Personal Property | Replacing your stuff (furniture, electronics, clothes) | Paid directly to you, usually based on Actual Cash Value (ACV) upfront, then topped off to Replacement Cost Value (RCV) once you show receipts. |
| Additional Living Expenses (ALE) | Hotels, rental homes, and restaurant meals while displaced | Paid directly to you as you incur expenses; never let them combine this check with your structural repair funds. |
Step-by-Step: How to Navigate a Claim from Day 1
Do not just wing it when calling your insurance provider. Follow this precise sequence to establish an ironclad paper trail that the insurance algorithms cannot easily pick apart.
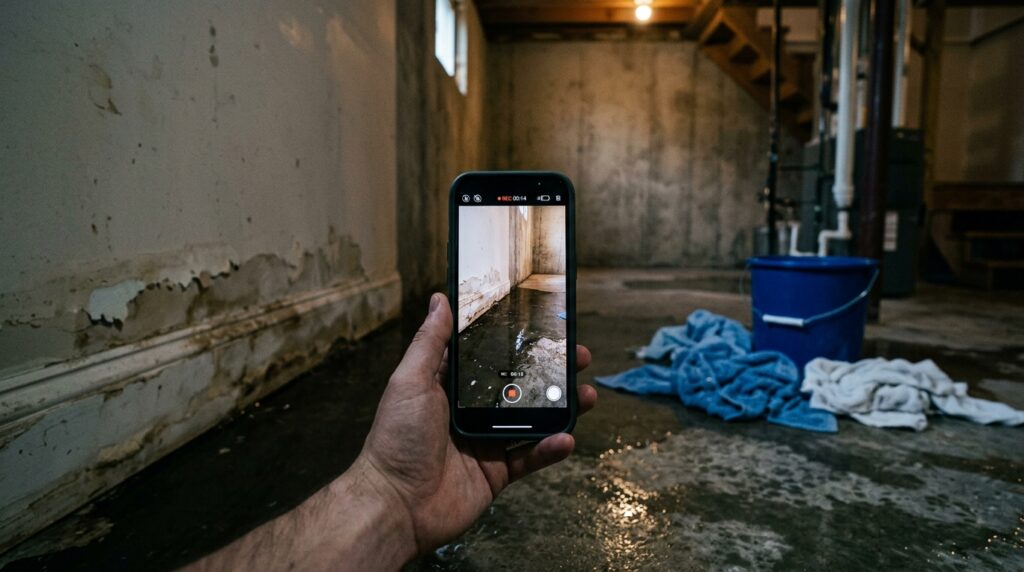
1.Document Before You Modify:Safety first, then data.
Before you clean up a single drop of water or sweep away broken glass, pull out your smartphone. Take extensive, high-definition videos and photos of the damage from multiple angles. Take close-up shots of the source of the issue (like the split in a pipe or the hole in the roof) and wide shots of the entire room.
2.Mitigate Further Property Damage:Do not commit to permanent fixes yet.
Your insurance contract states that you must take “reasonable steps” to prevent subsequent damage. Toss a heavy tarp over a leaking roof, or shut off the main water valve. If you need to buy plywood or hire an emergency mitigation company to extract standing water, save every single receipt—your insurer will reimburse these emergency mitigation costs directly.
3.Officially Initiate the Claim:Use your provider’s app for speed.
Log into your provider’s online portal or mobile app (like Allstate MyClaim or Liberty Mutual Mobile). Filing online bypasses hold times and instantly generates an official Claim Number. Enter the approximate date of the incident and a brief, factual description of what happened. Avoid using speculative language like “I think this leak has been happening for months,” as wear-and-tear is an automatic exclusion.
4.Prepare for the Adjuster’s Inspection:Your primary point of contact.
The insurer will assign a claims adjuster to your file. They will visit your home physically or schedule a virtual walkthrough via your smartphone camera. Have a comprehensive spreadsheet ready for them listing every damaged item, its approximate age, brand name, and replacement cost. The more organized you are, the faster they can calculate your repair estimate.
2. The Mortgage Company Catch (The Step Most People Forget)
If your home is completely paid off, your insurance company will cut a dwelling check directly to you, and you can deposit it instantly. But if you have an active mortgage on your house, you are in for an administrative surprise.
By law, your mortgage lender is named as a co-insured party on your policy. They have a massive financial stake in your house, so the insurance company will write the structural repair check to both you and your bank.
You cannot just cash this check at a local ATM. You have to mail the physical check to your mortgage company’s insurance department. They will place the funds into a restricted escrow account and release the money to you in tiers or “draws” as your contractor completes specific milestones of the repair work.
The Lesson Learned: Call your mortgage company the exact same day you file your insurance claim. Ask for their specific “property loss package” paperwork. Showing them your contractor’s signed bid and layout early prevents major delays when it comes time to pay your workers’ upfront material deposits.

3 Fatal Mistakes to Avoid During the Claims Process
Chasing a fair settlement requires you to be hyper-vigilant. Avoid these three common pitfalls that trap unsuspecting homeowners every year:
- Throwing Away Damaged Belonings Too Early: It is incredibly tempting to toss water-logged furniture or a ruined television into a dumpster immediately. Resist this urge. The claims adjuster legally needs to verify the existence and brand details of those items to pay out your personal property coverage. Keep the ruined items stacked in your garage or yard until the adjuster actively signs off on their disposal.
- Signing a Broad “Direction to Pay” Form: Some aggressive emergency mitigation or roofing contractors will push a document under your nose before they start working, claiming it just allows them to coordinate with your insurer. Read the fine print carefully. If it contains an Assignment of Benefits (AOB) or a broad “Direction to Pay” clause, you are legally handing over total control of your claim to the contractor. They can sue the insurance company or inflate costs without your consent, leaving you completely locked out of the loop.
- Accepting the First Structural Estimate as Final: The first repair estimate generated by an insurance adjuster is almost always conservative. They utilize generalized regional data software (like Xactimate) to price labor and materials, which frequently underrepresents real-world contractor costs in your town. If your contractor’s real-world estimate is higher than the insurance company’s baseline check, do not panic. Have your contractor submit a supplement request detailing the exact material discrepancies directly to your adjuster before structural work wraps up.
Final Thoughts
Filing a home insurance claim can feel like an overwhelming second job, especially when you are dealing with the physical fallout of a property disaster. But remember: your insurance policy is a legal, binding contract. You aren’t asking for a corporate favor; you are reclaiming funds you have continuously paid for through your monthly premiums.
Stay calm, maintain a pristine notebook detailing the date, time, and name of every single insurance representative you speak with, and let the data do the heavy lifting. By systematically documenting the loss, staying ahead of your mortgage company’s rules, and reviewing every line item of your estimate, you can ensure your home is restored to pristine condition without draining your life savings.